Tools & Technique

Friday April 13, 2018

To make good photographs, to express something, to contribute something to the world he lives in, and to contribute something to the art of photography besides imitations of the best photographers on the market today, that is basic training, the understanding of self.
–Edward Steichen

Name

First I’d like to again thank the very talented wonderful Artists at PhotoLogo
for my Signature File you see above.

Go here: https://photologo.co

There is a New Group for the PhotoLogo Community on Facebook. Very Talented Photogs are posting their wonderful images. Some people were actually making statements that they were overwhelmed of the talent.

I had an idea to post a technical question to see if I could help others. I asked who uses the BBF? That’s “Back Button Focus” for those who don’t know or not familiar with the term.

If your setting up for your image. You half depress your shutter button to lock on the Focus. Now if you change your position or Recompose your image. You have to half depress the shutter button again. Sometimes Locking on the exact Spot you need takes some time. Like the Eyes for Portrait.

But!! What if you could do this without having to Re Depress the Shutter Button again and now throwing your Locked Focus Point off? We can program the Button thats on the back of the camera right where your Thumb sits when your holding the camera and your finger is on the shutter button. We program this button for Focusing. Now AKA Back Button Focus. I don’t want to reinvent the wheel but this technique will Lock on your subject depending on the Focus Mode you have set on your camera. For Still shots like a Portrait I like to use a Single Point. Actually I like to use a single point for everything. Now we can move that single point to a side for Focusing on lets say the Eyes. Depress the BBF for locking on the focus and we can move the camera slightly to recompose to frame our subject in a better way.

Or if you change your Mode of Focus and now set the Active Servo “S” this BBF will actually make the Focusing Spot Hunt for the subject like a person or wildlife while they are moving. This technique makes the whole process a Lot Easier. Instead of trying to lets say follow a Bird in Flight by half depressing the Shutter Button. Then pressing it for the Shot! We hold down or press once depending on what your doing. The camera will continue to search for the focus if you hold it down. So we press on the BBF once and let the camera Lock on the subject. We follow it along and press the shutter button when we are ready to take the shot.

Very Convenient! Very easy. The overall response to my initial comment on who uses this went absolutely viral.

I will post a few action shots to use an as example. Is this Technique good for Everything? I doubt it. But a Lot of the comments say they use it for Absolutely Everything. There are times I don’t really. But lately I’m pretty much using it all the time. Too Bad my little P&S camera doesn’t have this feature….

Enjoy and have a Great Weekend.

Mark

Great Blue Heron in Flight

File Management

Friday Night Photography Quote:
Realism and super-realism are what I’m after. This world is full of things the eye doesn’t see. I mean even the eye of a senesitive person. The camera can see more, and oftentimes better.
Andreas Feininger
“Feininger as I Know Him” by Wilson Hicks, The Best of Popular Photography by Harvey V. Fondiller , ISBN: 0871650371 ,

For the past few weeks I’ve been discussing the Basics of Photography. From Depth of Field to trying to make sure your subjects are as sharp as possible.

This week I had run across a statement in one of the Photography Groups on Facebook. Someone who was a Newbie saying that they had run out of room on their hard drive and asking for Opinions on what to do!

→ Never Ever save your Images to your Computers Hard Drive!
Get yourself an External Drive. If you catch a good price get Two!
One as your working drive when your editing. The other will be disconnected from your computer normally. When your Backing Up your Images from your Working Drive you will then connect your Backup Drive for this purpose.

Keeping with this behind the scenes discussion. I’d like to discuss the File Management. I am speaking about All Your Images. I don’t care if you shoot in JPG or Raw. I don’t care which Brand of Equipment you use. Or if your shooting with a P&S or an Advanced Level DSLR.

Be extremely organized! Make sure that you know where your images are going before you do your Transfer Upload from Memory Card to Drive. I have a Directory System that may give you an idea of what I’m talking about. Lets say you have a Family Gathering. A Holiday or just a get together to visit some Relatives. You Must inside your Head think of how you want to classify this before hand. Maybe a Family Directory? Or Event Directory. But what are you going to call this “Session” so you will Remember it in the future down the Line?
See where I’m going with this? The last time I backed up my working Drive I had noticed I have over 50 thousand images. If I don’t exactly remember what I did. It’s a Logical or mostly Logical system. So it wont take me long to find what I’m looking for.

→ Never Work/Edit/Change your Original Images!
Whether in any format I will start working and after one or two steps/layers or whatever. I will do a “Save As”! Keeping with the files discussed in a Family Gathering. I will have it under Events. Maybe who ever was hosting this Event. Or whatever Holiday it was. Last Holiday was New Year so I will have it as Archive/Event/New Year. Then I will create two more directories Under the New Year. The first will be /working and the second will be complete. I may also have a directory for the Net. Never ever forget that the images You/We Post on the Net will always be Low Resolution and have your Watermark on it. Your Finished Images will be Full Resolution without a Watermark so you can print or email Your Beautiful Family Photos!

The reason for Not editing your Originals is in case We Mess UP!
We do! Or Like I do. I will go back now to a time I had very little knowledge and skill. Look around at some of my images and then look at the Working Directory to see what I did. Do I like it or not. Most of the time I will use the Original Image and take that to edit it with my current skill and tools. I might save it in the working directory as a second or even third image.

I was recently involved in a Nature Challenge on Facebook. I went back a few years into my Archives to find something and do a Major ReEdit. Because it was soo long ago I was using a very Limited P&S. It was the first camera I had gotten to Travel since I had put my camera down for several years.
We were going to Alaska and I asked my wife “how can we go to Alaska without a Camera”? This and the next trip is what made me make the decision to get myself a Real Camera out of frustration that the little P&S was way too frustrating for me. I had absolutely no knowledge of Digital or what or how anything was done. No One told me about Noise! I’m sorry that they didn’t! That little camera was way too Noisy the minute I used the very limited Zoom. At least the Basic Principles of Photography didn’t change. So I spent the almost the whole flight to Fairbanks trying to read that book called the Manual! What a joke that was! But I had no choice and worked it out.

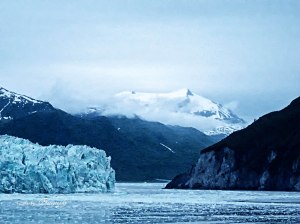
Here are two Images I had Reworked from Alaska that I think came out pretty nice. The Originals were Untouched JPG files. Considering I was forced to run an Anti Noise Plug In on each of them several times. Didn’t work a 100% but I’m satisfied! I was having trouble getting the camera to do what I wanted and when. The delayed Shutter was another thing that made me crazy! I’m used to the shutter clicking the minute you depress the button. Not 5 seconds later. What’s that About?

First one is of an Iceberg at Hubbard Glacier.
The second is of Mendenhall Glacier.

Hubbard Glacier Mendenhall Glacier


Like always. All comments and discussions are Welcome!

Have a Great Weekend,
Mark