This Past Week . . .

Friday Night Photography Quote:

Once the amateur’s naive approach and humble willingness to learn fades away, the creative spirit of good photography dies with it. Every professional should remain always in his heart an amateur.
— Alfred Eisenstaedt


We spent Thanksgiving Week with family down in Florida. That is the reason I didn’t get to post last weeks Blog. I had the opportunity to once again go out and shoot the amazing Wildlife in the immediate area.

While walking around the brush and being exposed to all that is possible. The mind wonders. To some you “Must” make noise to let the more aggressive creatures know that your there so they can have a chance to run off….. You know that this also creates a situation that as we Artists get frustrated because this also makes it impossible to shoot those creatures that we do want to see also leave…………

Stealth is the name of the game! Walk Silently! Move as quietly as possible so as to Not Startle the Wildlife and the Rewards are Endless……………. Keep in mind that the vibrations from your feet are also felt by the wildlife under the water!! The fish feel it and move away. Any birds in that immediate area will also sense danger and move with the fish………

Keeping all this in mind will have tremendous benefits.

Of course being at the right time and the right place makes it all come together.
Keeping a low profile while an incoming bird decides to land near you will give you the opportunity to create some magnificent images… But!!! Make sure you understand your camera! All the posts! All of the my previous discussions hopefully has given you the tools to work your camera and to make those settings a reflex!

Birds in Flight!!
To capture a moving subject knowing that the foliage around me will interfere if I’m not careful for my focusing! Active Focusing On! Tracking the moving subject is now Not the Cameras Problem. It’s Mine!! When the Shutter is Depressed that mirror comes up and blocks my view. So now it’s all up to me to keep the camera pointed in the right direction to follow the moving subject.

For these shots I was lucky. I noticed a Great Blue Heron coming towards me. I was standing near a tree and trying not to move. In keeping a low profile I wouldn’t annoy this magnificent bird to make it go to a different area and fly away. I glanced down at my camera to make sure my settings were all good. I also happened to have my BBF “Back Button Focus” set to the “On” position.

For those that might be curious here is my Exif Info:
If you do not know what this means: google.com/ definition Exif Data

Nikon D700 using the Nikon 70-300 VR Lens
Aperture Priority
Aperture: f:8
Shutter Speed: 1/320 sec
ISO: 250
Back Button Focus and 3D Tracking in the On Positions.
All Images shot in the Nikon Raw NEF Format on a Hoodman Raw Compact Flash Memory Card. Hint: Use the Fastest Card you can afford. I’ve had this wonderful card for a few years now. At 675x it can keep up with me as you will see.

Hand Held
All Images edited using CS4 and the Nik Collection


By using Aperture Priority I’m keeping the same Depth of Field to make positive that my moving subject will be in focus. Doing this also makes the exposure consistent throughout all 8 images. Think for a second please? If I had used the “Full Auto” setting would All 8 images have the same exposure? Would some be darker and others show a lighter image? I wouldn’t want that. I want All the images in a set to have the exact same exposure properties. To do this we use either of the “Semi-Auto” settings. Fully Manual might work as well but on a moving subject that shutter speed needs to be able to keep up with any changes in the light. So that is now my variable to keep the exposures exactly the same from All 8 images. Even the ISO is on manual and I have it set in the spot I was in for 250.

Time of day was mid to late Sunrise and I happen to be facing where the sun was coming up on the horizon. The location was Boca Raton Florida.

Have a Great Weekend everyone. Of course more images will be up in next weeks Blog Post.
Mark

Learning to Improve . . .

Friday Night Photography Quote:

Any good photograph is a successful synthesis of technique and art.
— Andreas Feininger


The desire to be better than you were yesterday! To learn new techniques or to acquire a new skill! To improve upon our own Art.
That my friends is the time honored goal of most of those who I’ve found that are members of most of Art/Photography Groups on Social Media. aka Facebook.

The difference of those creating Photographs to those who take Snap Shots.
Straight Out of Camera? Doesn’t matter. I’ve seen those from real Artists who make damn sure to get it right in Camera. Composition and Focus? Check Background? The way they wanted it to look. Check! To proper exposure…….

Now we’ve all seen those images that the main subject is way underexposed. All the way to we can’t even make out what the subject is because it’s Not in Focus.
There are those who make excuses like it’s too hard to learn to oh I don’t care about that? Seriously?? Someone even tried to criticize one of my images because they felt that the subject wasn’t centered?? I did explain that I did that on purpose to create tension and movement in the image. There response was “Oh”. In the early days of everyone getting there hands on a camera. I’m talking about the mid 1950’s to the early 1970’s where one of the things that was told across the land was:
If your taking a picture of someone. Have the Sun over one of your shoulders to make sure that the people in your pictures were bright enough. They didn’t care that the subject was crunching up their faces because the Sun was in their eyes!! LOL
They didn’t know and thought they were doing what they were supposed to.

In our current crop of everyone having a camera available. It’s gotten even worse. I still call it the “Dumbing Down of Society”. Of what the Bare Minimum should be of even the worst “Snapshot”! Focus People. All you have to do in todays Smart Phones is to tap on the proper place for the Focus. That will at least get your subject Sharp.

Next is Subject Matter!! What Are You Trying to take a picture of? What is your Main Idea for the Image? To take a picture just for the sake of taking a picture and not even having a Main Idea? Why? Why are you thinking that the Subject is Worthy to show?

Getting passed that. What about these images that are shown all over the Net?
Too Dark! Out of Focus! They are getting Liked and Comments saying oh thats wonderful? That’s Great? People actually believe that they are Great? Or are they just being Nice? I simply Don’t Understand. I’ve been involved in the Hunt to better my Vision. To better my Techniques ever since I was an early teenager. Maybe 14 years old or so. I’ve found one thing that from everything I’ve learned. From all the acquired knowledge and skill I’ve been able to remember all these years. This Line, This saying, still holds up and I’ve been saying to my students for many years!!!

The more we know. The more we know we Don’t Know!
— Mark G

Recently I was informed by a person that said “I Like it Natural”. They are not interested in anything to better an image.

Lets make one thing perfectly clear! Nature is Beautiful!
The Cameras from the Smart Phone to the High Tech Marvels that are the most recent to hit the Stores. All have limitations. When someone says they like photographs to be natural? They are obviously clueless as to what exactly is happening.
First when your Smart Phone to Point and Shoot cameras take a picture. Automatically inside that image is going through a process of programming. If you have the Menu Set for Sharpening the Image? Do you have set in the Menu that you want a little bit more Saturation? All of this is applied to your Image. Then this process goes through an algorithm to remove repetitive pixels. Then this image is compressed and saved to your Memory Card. This is obviously A Not a Natural Image and B is obviously what a true JPG image is. Also that removal of pixels?
That can be up to 83% of your actual image!!

Now going back to the limitations of the tools. Keep in mind that Color Photography is pretty much still a recent development. The average person was still shooting B&W up to the mid and late 1970’s. B&W Film was hard pressed to be beautiful. We had to learn how to not only shoot it properly. We had to learn how to take those Negatives into the Darkroom to make a Beautiful Image.

We thank Ansel Adams and Fred Archer for that. You have to understand that the pictures were muddy. Hard pressed for details. We couldn’t get even a half way decent image. We were frustrated! But Mr Adams and Mr Archer had to figure out a way to get a better image. They were Not Happy and said something is wrong. We Need to find out a way to get around this. Well they Did!! They called it the Zone System. Look at it this way. Ansel Adams would take a picture. Then bring this image to the Darkroom. There he would spend weeks and sometimes even Months to create one of his wonderful works of Art that we all know today. Why? He Cared! He wasn’t Satisfied with that dark out of focus that is hard pressed to actually figure out what is trying to be Said??

What Are You Trying to Say with Your Images? Are Your Images Worthy of Hanging on a Wall Matted and Framed?

Taking a picture just because you can doesn’t mean you Should…..

Nature Creates some Wonderful Things. The Limitations of the Camera means it is Not Capable of Capturing the Beauty that we Witness with Our Eyes Alone. The Camera and it’s Sensor has limitations on what it sees. In Photography were refer to Light in the terms of Aperture. Our eyes from full black to bright white can see about 16 Stops. The Best Cameras can capture the Latitude “Range of lightness to darkness” of almost 9 Stops. The average cameras are about 7. Smart Phones? I would say a Lot Less.

So how do we help this limitation to produce a better image to show more closely what Nature Created? By Bringing this image into the Darkroom. The Digital Darkroom.

For this image I had shot a few years ago. I knew ahead of time that at Sunrise the landscape was going to be real dark the sky was going to be real bright. That in other words was going to be way outside the range of my camera sensor. So I had purchased whats called a Graduated Neutral Density Filter. The Neutral part is so I wont get any color shift. The Density stands for making the bright parts darker. The Graduated part makes the filter clear on one side and gets darker slowly up to almost black on the opposite end.

I had my tripod set. Took a meter reading and made a generalized average of what I thought it should be. Setting my Camera on Full Manual so I can control it and make any changes without the camera interfering. I also used Manual Focus to make sure that on any changes I made. The focusing on the Camera wasn’t going to change without me knowing about. In other words I took all the Variables out of the equation so I could have Full Control.

Nikon D700
Sigma 24-70 @ 32mm
ISO: 800
Aperture: f:22
Shutter Speed: 0.4 seconds

Shot in the Nikon File Format NEF
Edited in Photoshop using the Nik Collection

Sunrise over the Grand Tetons_4180

Any Comments? Any Questions? Please feel free to leave a Reply and or Contact Me.
Have a Great Weekend Everyone!

Mark G

Finding Time

Friday Night Photography Quote:

“To convey in the print the feeling you experienced when you exposed your film – to walk out of the darkroom and say:
‘This is it, the equivalent of what I saw and felt!’. That’s what it’s all about.”

— John Sexton


That quote is the why! It’s the thrill of seeing your final image that captures the idea or mood of what you felt when you first clicked the shutter.

Ansel Adams sometimes spent weeks or even months working on a single image till he felt he got it right. Today’s technology is no different. People forget that when you click the shutter that is only the start of the process of what makes an image in photography. The Digital Darkroom is no different. Photography always had a mystique to it. An unexplained magic that had the level of skill to be able to capture the moods and emotions in our image.

There is an initial problem with this. The camera lens whether being any kind of instrument behind it. Does not and can not “See” the same way our human
eyes can. I won’t go into the specifics of color or range of lightness to darkness. That comparison is all over the net for you to research if you so desire.

So we now take this image into the Digital Darkroom to play with this Magic. Our human frailties come into play. What is our current mood/feelings?
What was our mood when we shot this image? What do we want to say with this image? This all changes of course depending on the emotions running
throughout our heads.

Lately because of the craziest moments I do not have time to shoot. Too many things getting in the way. So I go back into my Archives. The Archives are actually what this discussion is all about. Those images that were overlooked previously. There there! That’s one of the reasons we or I do keep them. When we learn a new technique. When we learn how to do something in a different way. We can then go back and look around till something just jumps out at us and say “Hey Pick Me”!!

The image I’m about to show you was shot back in 2011. We had traveled to the Midwest for a Vacation/Tour. While walking around just taking in the
surrounding beauty of the location. This family was walking to the building. Between the harsh hot sun. The heat in the parking lot with the mountains
in the background. I thought the contrasts of the way they were dressed fit in perfectly. In Salt Lake City the extremes of mentality is always present.
But it works.

Now looking back I have no idea what was kicking around inside my head. I had made a fast decision to shoot this. Probably from my hip so as to not startle or offend. The first color image is absolutely SOOC (Straight Out Of Camera). That is I did Nothing to this image except convert it to a JPG. You see I don’t shoot in JPG.
I shoot at least as often as I can in what’s called “Raw”. Even in my older technology camera. The differences are enough to give me the tools to be able to play with respect of trying to create an image that at least resembles more of what my “Eye” saw at the moment of capture. More details. More range between the lightest part of the image to the darkest parts. For reference we call that “Latitude“. Now when I say more details. A JPG image is 8 bits of information per pixel.
For my camera when shooting in “Raw”. I’m getting 14 Bits of Information per pixel. Also the algorithm that the JPG image goes through before being Saved to the Memory Card takes out a lot of repetitive information and discards it. Excuse Me? That number is 83% of the details of “My Image” was “just thrown out without my permission”!
Some person sitting in a Clean Perfect Lab somewhere made that decision to discard my information. Sorry! As an Artist I want and need every single bit of information I have available. That’s MY Decision! What I want to Keep or Not!
So I can decide what to enhance. I can decide and make this image more presentable than some Person sitting in a white Lab Coat who has no idea of what my intentions
are.

Now at first glance this looks like an ordinary shot from some family trip. Is it really? You see I do not know them. Have never met them or have spoken to them.
I just thought at this moment in time. They looked worthy of being captured for all Eternity for Art Sake. To me they looked perfect. A normal family leaving
their vehicle and walking through a hot parking lot to a building. The way they were dressed made a great contrast to the cars in the background. Everyone seems to be carrying their own bottled water. The father is opening a bottle for the son.
At the time of capture I didn’t notice the other family in the distance. Wearing more of a contemporary modern style. With the looming mountains in the distance.
It felt like I was witness to a place that at that moment became a center of all Time. Time Travel grasped the old and new all at the same time.

So I cropped out some of the distractions. I felt that the shadows were just as important here. I wanted to create depth of the shadows from the mountains in the
background. It looked only OK in Color. I wanted to see what doing a conversion to B&W will do. In my first attempt I lost the tones and details of the slight grey of the cobble stones in the foreground. But the shadows added depth for the mountains. Hmmm OK I deleted that attempt. See that’s another reason why we also use “Layers” in Photoshop. So in case we don’t like something we just get rid of that “Layer”. So it doesn’t affect any other work in different areas we’ve already done and think is acceptable.

See we don’t shoot in B&W either. Either a Cell Phone or a “Real Camera” can’t capture the tones that the old B&W film did when I was a kid.
There is a way to have a camera altered by a company to shoot in B&W. Or even Infra Red but that’s kind of strange. First I don’t happen to have an extra Camera lying around that I can do this to. The one camera I have I still want to shoot in color. Besides that is expensive. For converting a Camera I will also have to purchase another Camera? I don’t think so. They are extremely expensive to begin with.

Getting back to B&W. Shooting in Raw also gives us the option of playing with the color channels for B&W. In JPG that and a few other choices are not available.
In B&W the color channels act like Filters. These filters effect that part of the light spectrum from what is actually in the image.
Making only that part of the light darker or lighter to give separation contrast and depth to the image.

I was now able to keep those tones in the cobble stones in the foreground. After making several adjustments I then took this image back to the program
for the B&W conversion to play and see if I can make the tones smooth and give more range of the lightest and brightest areas compared to the darkest
areas.

I am including two images.
Straight Out of Camera. My first working color edit. Then the B&W end result.
It’s a nice image. Nothing to go crazy about to have matted and framed for someone’s wall. It’s an exercise in B&W editing for me. Using a Two Step process is Not Normally what I do for B&W. I’ve heard about but have never attempted it.
Now this places another Tool at my disposal when and If I need it.

Original

SOOC Nothing done. No Editing except to convert it to JPG so you can see it.

2011Aug13_Yellowstone_4428

BW Conversion

All Comments and Criticisms are accepted. You Like? You Don’t?
You have any questions I would be happy to make an attempt to answer them.

Have a Great Weekend.
Mark

Light and Shadow

Friday Night Photography Post:

Chance is always there. We all use it. The difference is a poor photographer meets chance one out of a hundred times and a good photographer meets chance all the time.

— Brassai


As Photographers it is Our Responsibility to Understand Light and Shadows.
In this Fast Paced Digital World we live in. With Cell Phone and Point and Shoot Cameras. It’s very easy to get caught up in “Oh That Looks Good”!

Not Realizing that what we see with the human eye doesn’t necessarily work with just pointing and clicking. Taking pictures of everything and anything is a way of life.
Making that image Photographically Correct is a whole Nother Ball Game.

For some reason Photoshop or Digital Darkroom has become a Dirty Word??
Why? Because some people enhance too much. Edit too much and that particular image is exaggerated to such a point it is called “Fake”!!

Making a model thiner? Editing out something? Has always been there. Even in the Old Wet Darkroom Days.. The average snapshot shooter either doesn’t or doesn’t want to understand that Clicking the shutter is just the beginning of the whole overall creative process to create an Image.

A Stray hair? Something in the background that needs to be removed?
To lighten something or even to darken something to make the main idea of an image stand out. That is done in the Digital Darkroom my friends.
You see I never did like the idea of changing someones head and putting it on another body. To me that’s Nonsense.

Unless a camera is setup specifically for shooting in B&W which Yes! There is either a store bought or a body is sent to be converted to a specialist. Those Like Me will shoot in Raw in Color. Then take that image and do a B&W Conversion. Now I mentioned shooting in Raw.

Raw:
Lets the camera sensor loose! It maximizes the latitude. Meaning that a Raw Image will have more range between the brightest Whites and the Darkest Blacks. There is No Loss of information and is not a compressed image.
A JPG Image in the process has 83% of the information thrown away before that image is compressed.

Now I realize that All the images we see on the Net including my images are all JPG right? But I now have All of the image information to play with and control before I Myself make that decision to then convert that image to a JPG to be able to be pushed up to the Net.

My Control!! What I See and What I Want to be Seen!
Now add this to playing with Shadows and Light. A JPG Image is always 8 Bits of information. Depending on the Camera a Raw Image can be 14 Bits of Information.

Ahh ran out of time. Have to do something. I might add to this later.
Have a Great Weekend Everyone.

Mark

140728_Venice_Italy_BW

Canal in B&W Venice, Italy

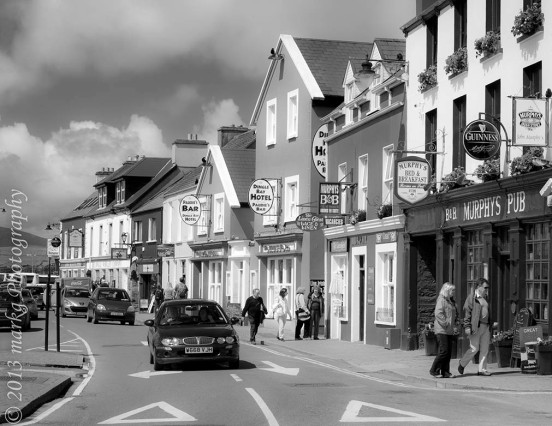
Dingle Town- IrelandIreland

IMG_0624

Florence, Italy

To All Our
Friends and Family


mothersday2016

Happy Mothers Day